Products
Solutions
Resources
9977 N 90th Street, Suite 250 Scottsdale, AZ 85258 | 1-800-637-7496
© 2024 InEight, Inc. All Rights Reserved | Privacy Statement | Terms of Service | Cookie Policy | Do not sell/share my information

To manage a project successfully in Control, the correct project details must be added before project initiation. To view project details, go back to the All projects & organizations page of the InEight cloud platform.
The Organizational Breakdown Structure (OBS) represents the hierarchical company structure. It can have regions, such as Eastern and Western, and within those regions, the company can have also divisions, such as Electrical, Paving, and Masonry. The organization can continue to be more refined to the level such as states, cities, districts. Projects are the lowest level of the structure but they do not show in the OBS.
The OBS controls your access. Where you are assigned in the organization determines what access you inherit and the visibility you have to other areas of the OBS. The higher the level a user is placed on the OBS, the more actions they can perform, and the more organizations and projects they can view. A user assigned at only the project level has no visibility to any other projects or administrative pages.
To access the OBS, go to All projects & organizations > Organization.
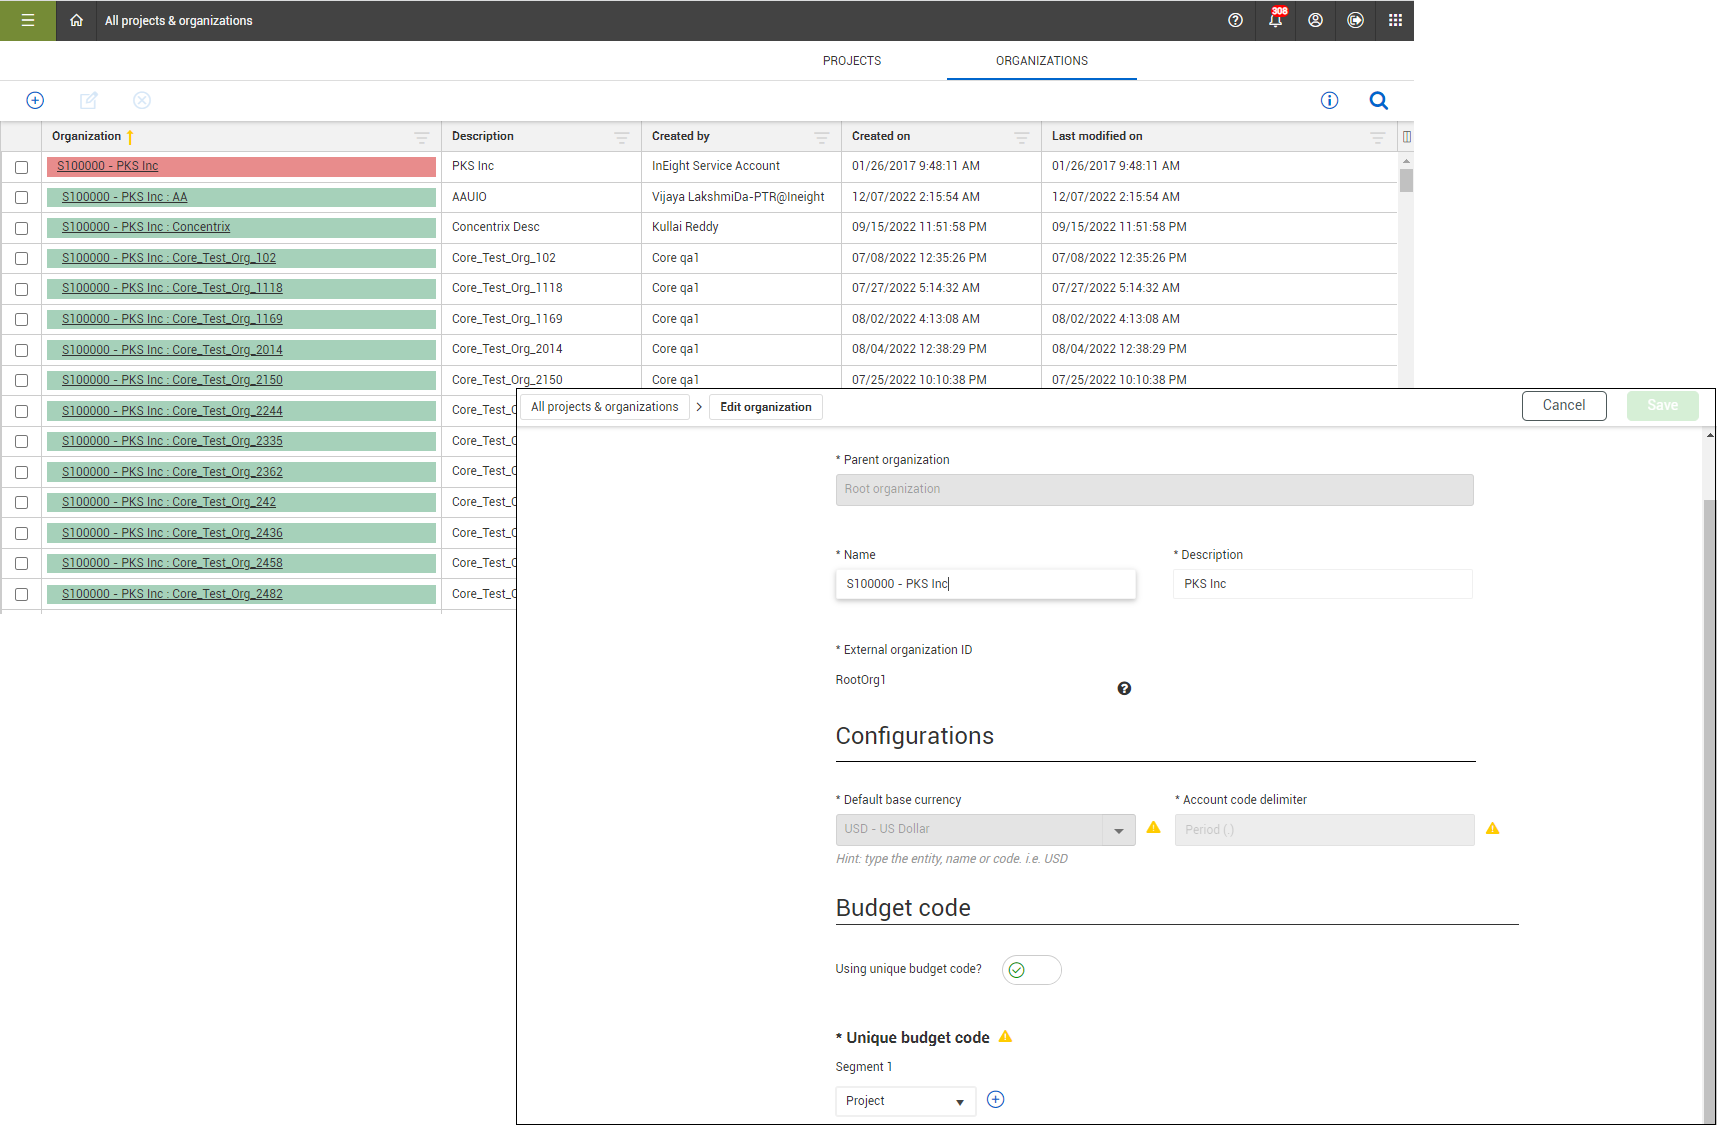
You can populate budget segments in Workspaces to show a unique code label. Unique budget code segments contain additional options to identify a cost item using four independent fields that are separated by periods. Budget codes can be configured at the organization level and are primarily used with Time Center.
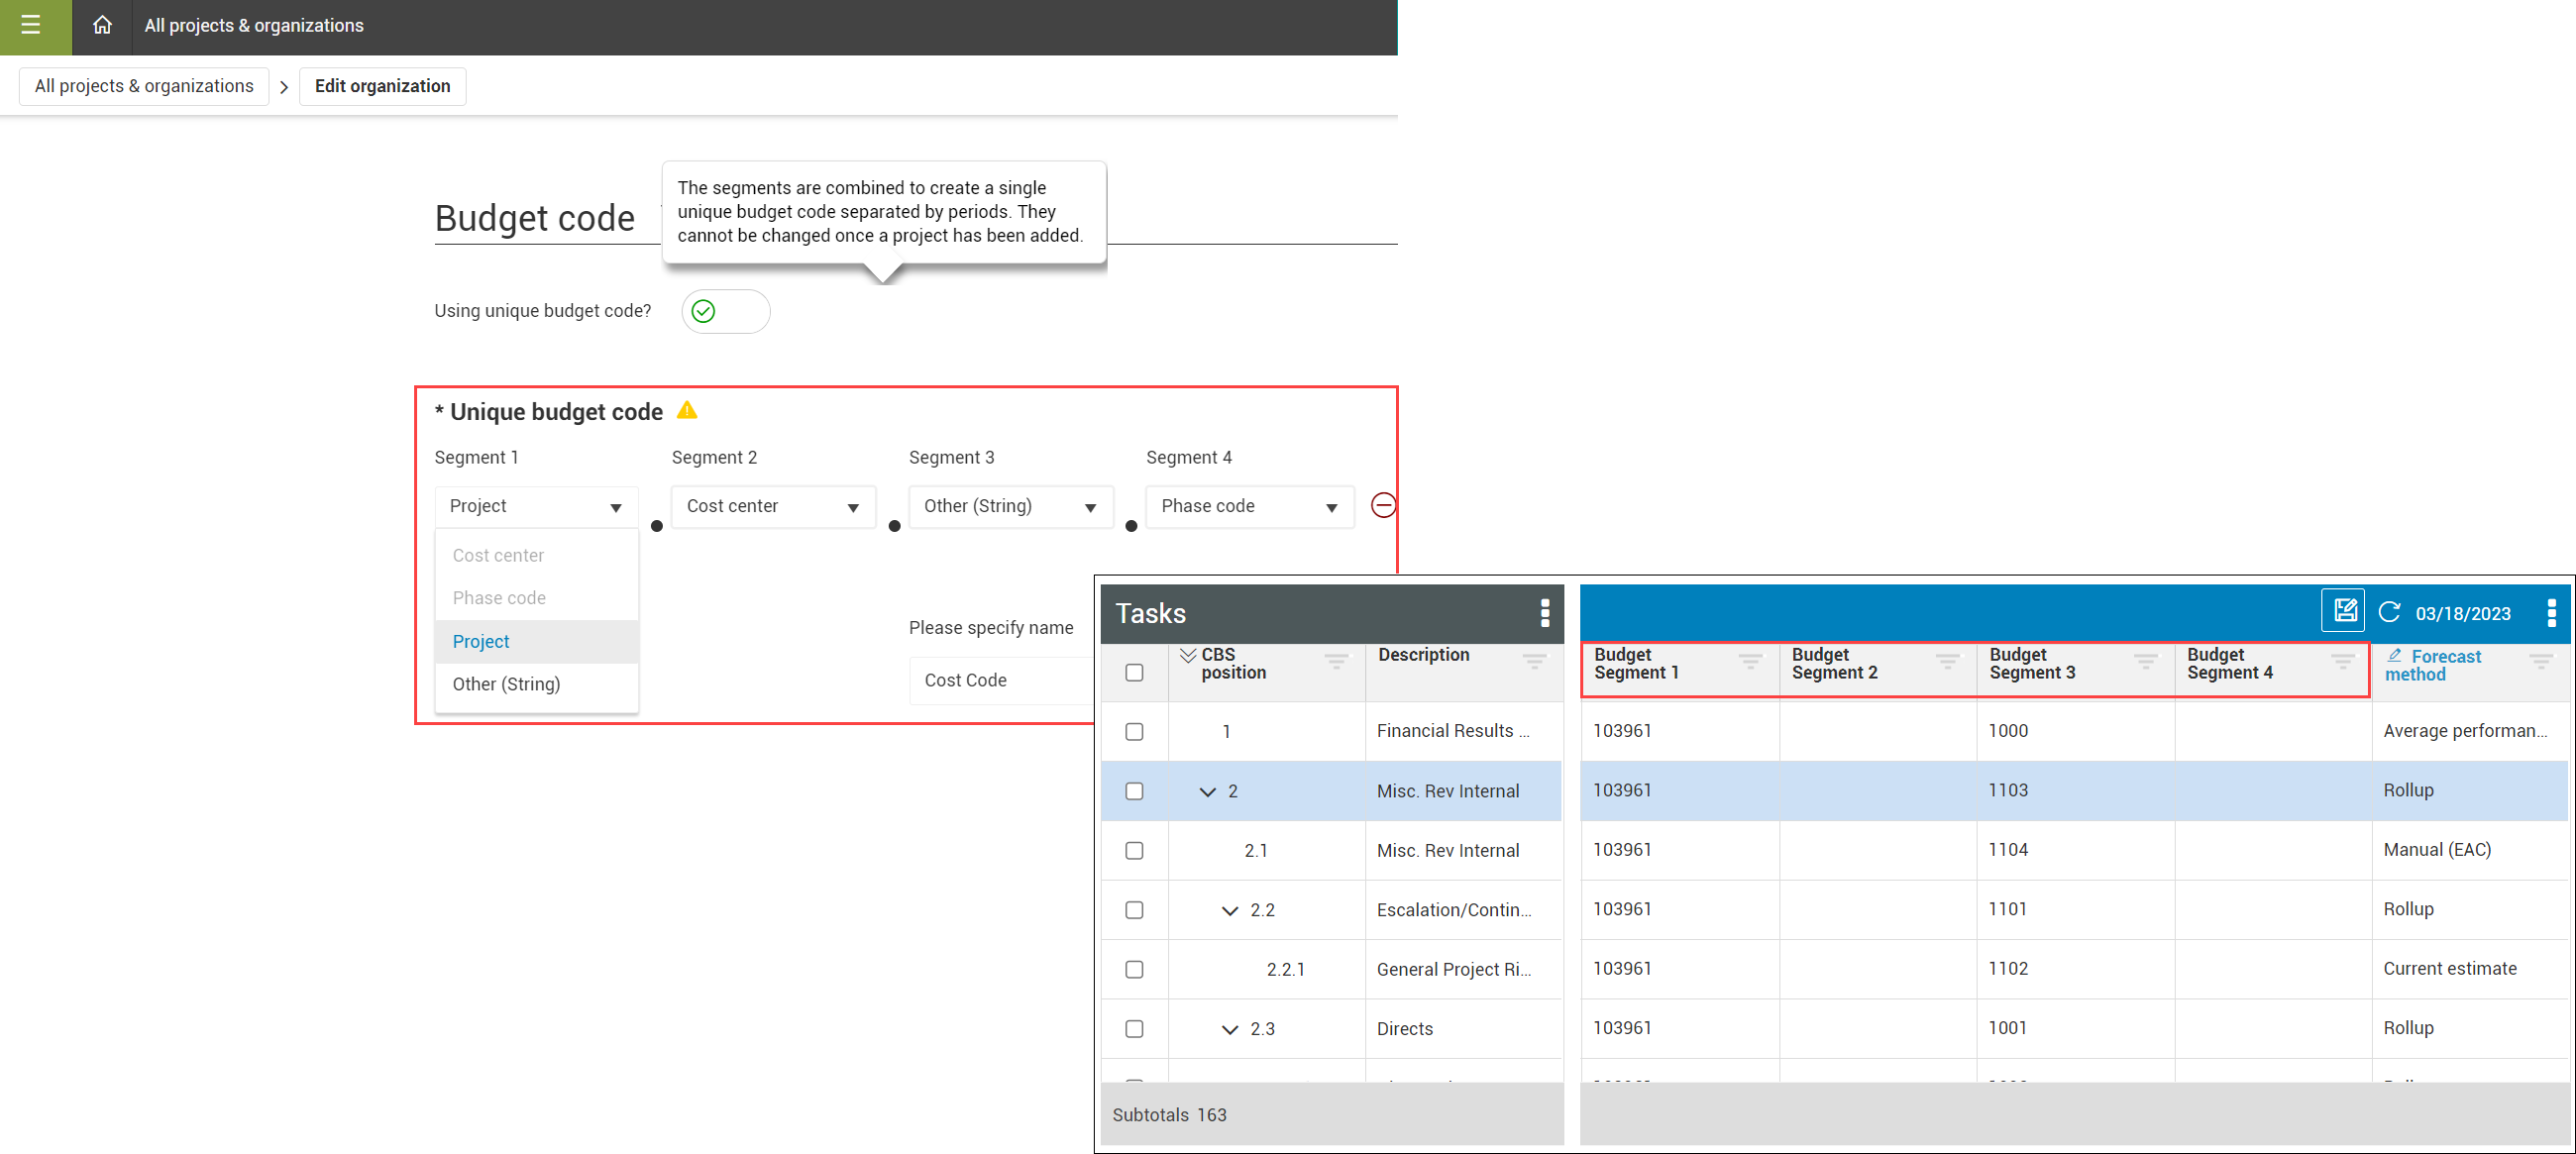
When the edit WBS phase codes and budget segments permission is assigned to a role in Suite administration > Roles and permissions > Control, users are allowed to populate the WBS phase codes and budget segments in the CBS workspace. This permission only applies based on configurations set for the WBS phase code and the budget segments. The edit WBS phase codes and budget segments permission must be selected to allow users to edit WBS phase codes and budget segments.
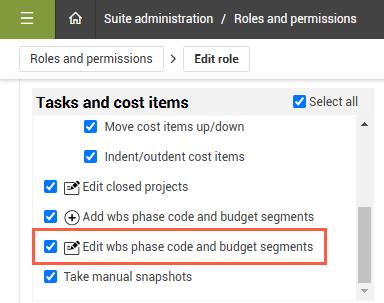
When only the Add wbs phase code and budget segments permission is assigned, users are only allowed to import WBS phase code and budget segments, and not to edit them.
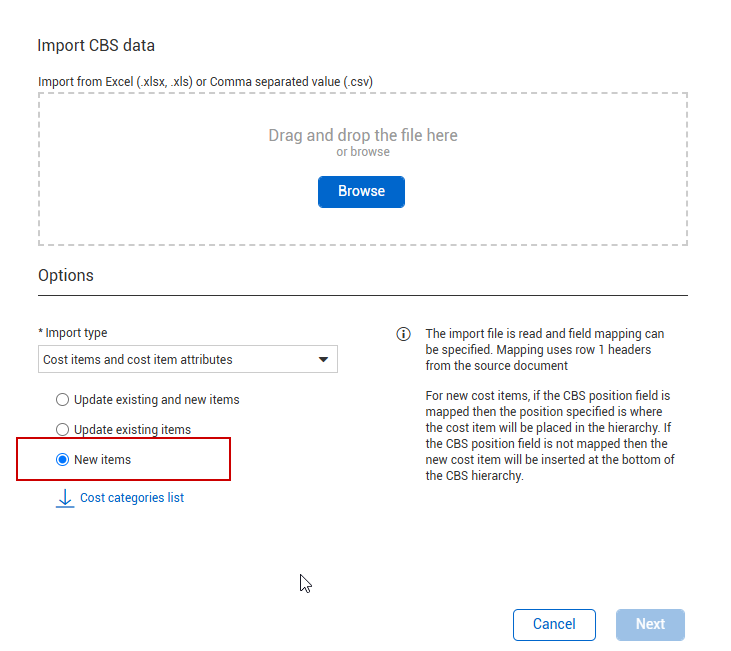
When importing, users who have only been assigned the Add wbs phase code and budget segments permission must use the New items option in the Import CBS data dialog box.
From the All projects & organizations page, right-click on your job.
Select Edit Project, or click the Edit icon.
The Edit Project page is where general project setup information is edited and stored, including the following settings:
Project Details
Location
Project Dates
Prime Contact
Currency and Markets

You access Project settings from the Project home landing page. From the Project home page, you can either:
Select Settings from the side menu
Select Manage settings on the Settings tile

The Project settings page contains setup information for all the InEight products, including Control. A list of tabs on the left allow you to navigate to the appropriate settings for each application.
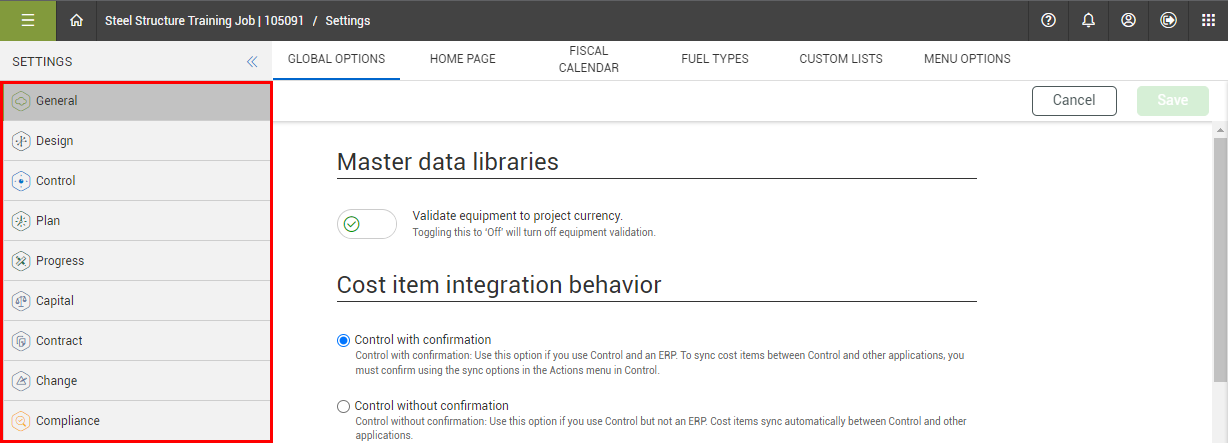
The settings that pertain to Control are located under two of the tabs, as listed below:
General
Home Page
Global Options
Fiscal Calendar
Document Types
Custom Lists
Attribute Definitions
Menu Options
Control
Project Tracking (Organization, Project)
Forecast (Organization, Project)
Estimate Resources (Organization, Project)
Schedule (Organization, Project)
Revenue (Project)
Sync Integrations (Project)
Others (Organization, Project)
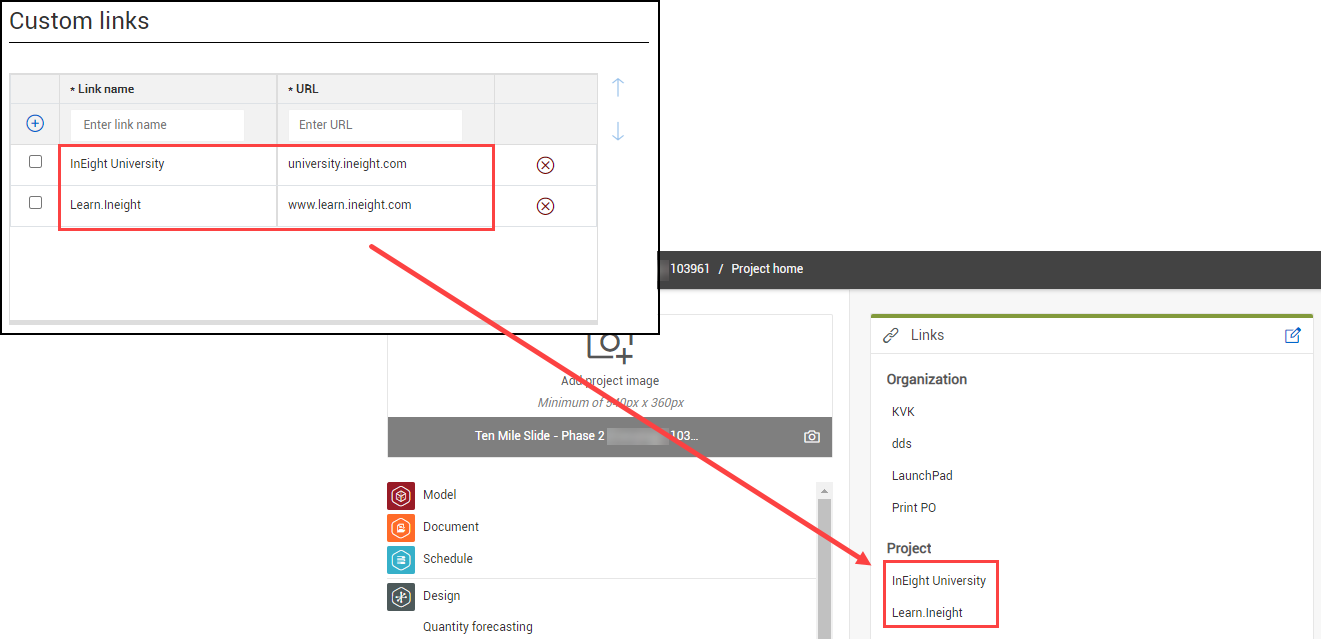
The Home Page tab lets you create URL links to be placed directly on the Project home page at both the Organization and Project levels.
The Global Options tab controls the master data libraries, cost item integration behavior, advanced work and scheduling features, and the template library. The three cost item integration behaviors provide flexibility in how to configure Control with and without a direct tie to an ERP system. There is also an option to pass cost items directly from other sources to applications.

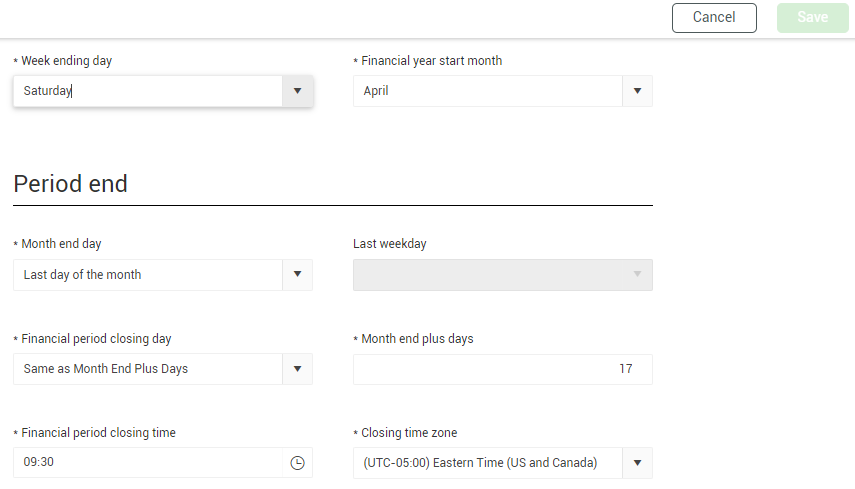
The settings in the Fiscal Calendar can be set at the organization and project levels. These settings specify the start and end dates for fiscal years and financial periods, such as month-end dates. It is important to know the different cut-off dates, especially when you pull the current period actual quantities to compare them to prior periods, or when you synchronize your quantities with the other applications.
Changes to a project level fiscal calendar only impact the project, while changes to the organization level fiscal calendar impact all projects that do not have fiscal calendar modifications. If there are no changes at the project level, and the project matches the organization fiscal calendar settings, the project inherits the organization-level settings.
Any changes to the project fiscal calendar impact read-only snapshots, which are captured at the closure of month-end plus days, for the period month being closed. Changes also influence the monthly time buckets in time phase forecasting and budgeting and to the time periods in which claims can or cannot be posted.
You can assign a document type to InEight applications. This lets you filter the payload of Document Types for visibility and use in the assigned application.
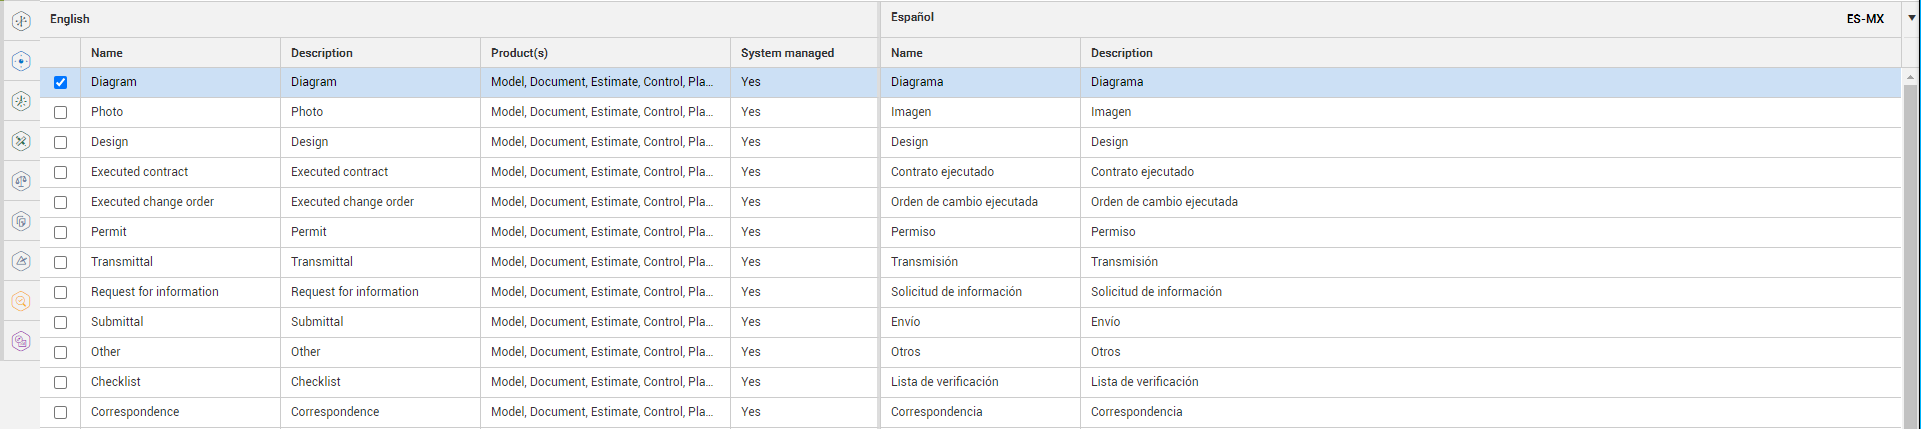
Like the tag feature in InEight Estimate, you can enter your tags and their values to use later for categorizing your cost items as you manage your project in Control.
Many of the tag fields are validated fields, meaning you can choose from options in a drop-down list. You define both the names of the tags and their drop-down values here.
The field names associated with Cost breakdown structure and Account codes, are tags defined and editable at the organizational level; you cannot edit them at the project level, as indicated by the statement “Inherited from parent organization”.

You can create direct links to URL addresses outside of Project Suite under Custom Lists. In the URL Field values you can define a URL with associated criteria to be used as an attribute for a cost item in the CBS.
In the URL Builder enter a URL that you want associated with your list name, along with any other dynamic attributes such as Project ID and CBS position code. Paste your URL and highlight the section you want to reference with another field. First highlight an attribute in the URL string, and then click the [T] reference icon to select which field to connect with.

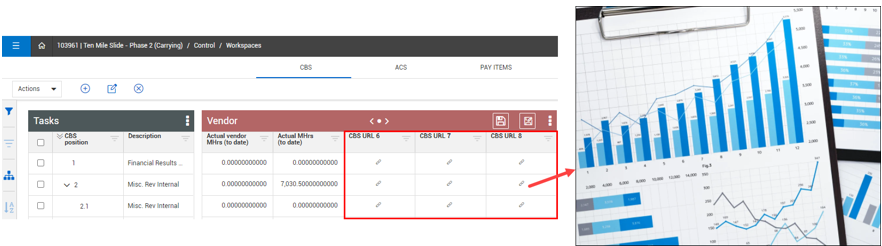
These quick links are accessible in the CBS and can contain detailed information pertaining to the cost item and project, which can also link to external reports.
In the CBS cost item details attributes slide-out panel, the URL is concatenated to include the attributes defined. A link is included on a cost item that opens a new tab.

The links can also be accessed in the CBS register. Up to five CBS URL columns can be viewed in a data block in the CBS, per project.

At the organization level, CBS URL columns 6, 7, and 8 have been added to the CBS register. When you define a CBS URL, it is then applied to each of the organization’s projects.
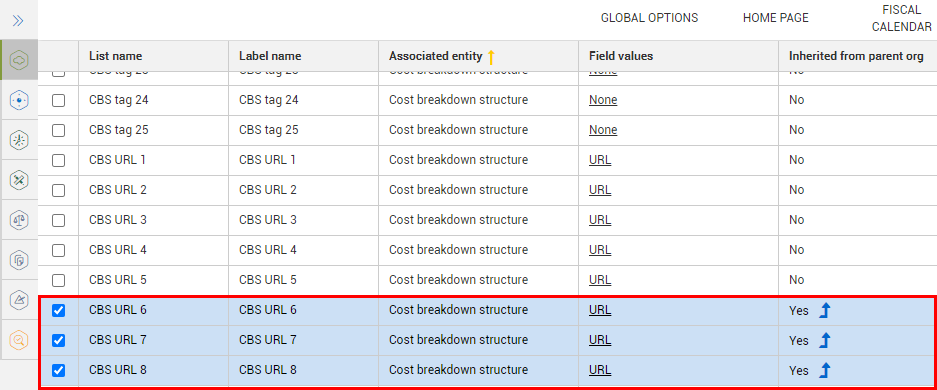
Creating organization-level CBS URL links lets you associate shared documentation, such as external standard reports that are used across the organization. Instead of setting up links for every project, you can create a CBS URL link in Settings > Custom Lists.
Attribute Definitions are used to define project attributes which can be of the types text/date/number or can have source values from Organization, Project, and Market master data. These definitions are inherited to all projects in the organization.

The below URL addresses specific to InEight products are updated when licenses are purchased or activated. The URLs are customer specific. The ability to maintain the URLs are intended for users with account admin only (root Org Setting) permissions. If no other products are purchased or activated, the URL opens an InEight related page to learn more about the products.

Under the Control tab, Project Tracking settings configure how your project tracks progress and percent complete in Control.
These settings include the following options:
What level to lock down your CBS structure to
What value to base percent complete off
If percent complete are capped at or allowed to exceed 100%
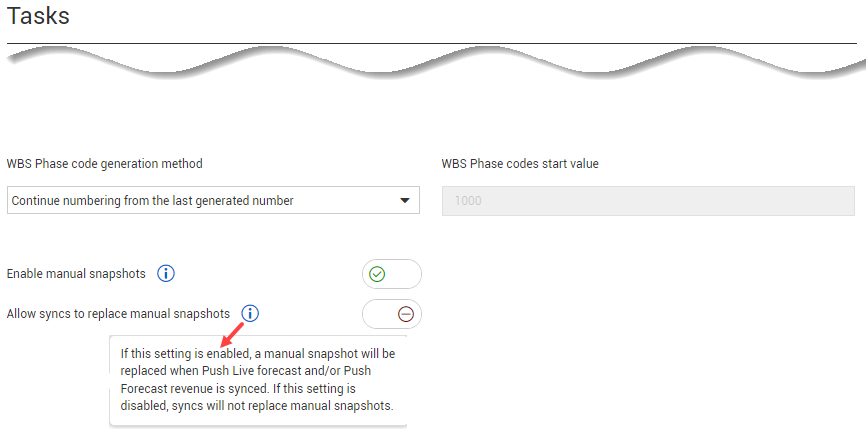
The first option in the Tasks Section lets you maintain your CBS structure at a specific level. Selecting yes, lets you determine your own CBS structure level.

The second option is WBS Phase Code. Select Yes or No under the Generate WBS phase code automatically?
Yes indicates phase codes for newly created cost items to be automatically generated
The WBS Phase code generation method regenerates all values beginning from the specified start value
The value entered in the WBS Phase code start value is the phase code for the first cost item created. When automatic phase code generation is activated, the proceeding new cost items is automatically created based on the phase code generation method selected.
No indicates phase codes for newly created cost items must be manually entered
You can create a manual snapshot of Control project data in the CBS and Pay Items registers.
If you have the Enable manual snapshots setting enabled, you can create a snapshot at any point in time, separately from any of the above-mentioned syncs.

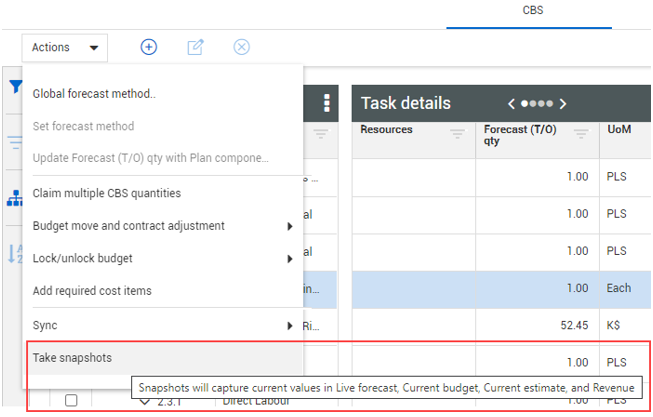
When the Enable Snapshots settings is enabled, you can select the Take Live Snapshot option from the Current Live Forecast drop-down menu in the CBS to capture current values in the Live Forecast, Current Budget and Current Estimate.
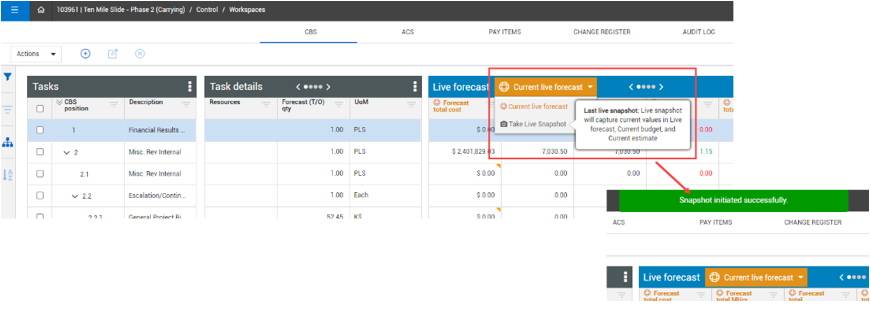
Snapshots can also be taken from the Actions menu.
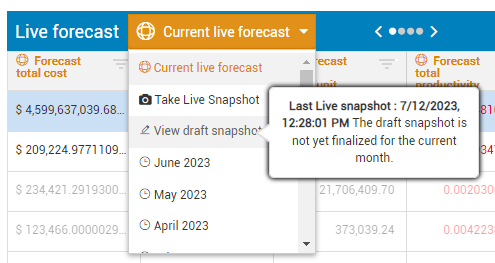
You can view the draft snapshot by selecting the View draft snapshot from the Current live forecast drop-down menu. This lets you know that the draft snapshot is not yet finalized for the current month.
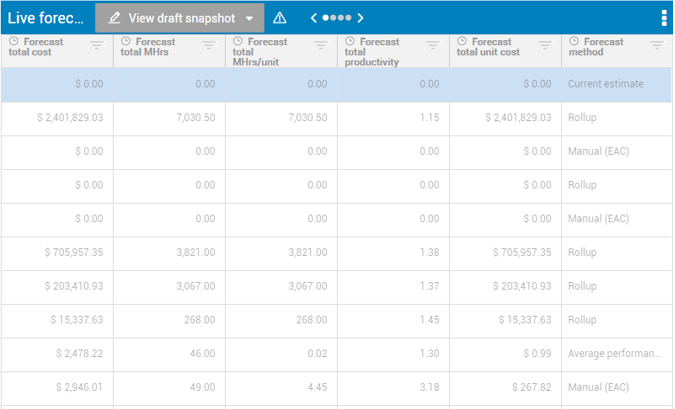
When you select View draft snapshot, the snapshot values load into the CBS in a read-only status.
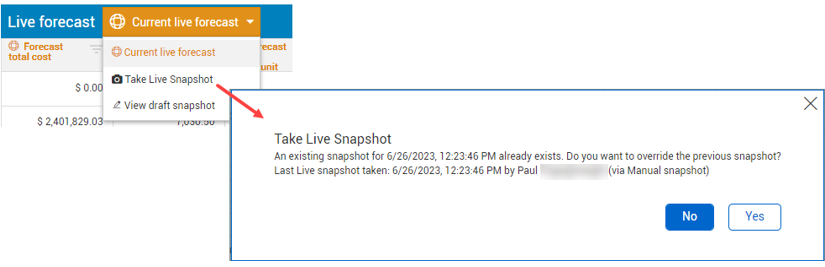
When you select the Take Live Snapshot meu-option, consecutively, a message lets you know that an existing snapshot already exists and a choice to override the previous snapshot.
The same snapshot functionality now exists in Pay Items, with the exact same option.

When the Enable manual snapshots and the Allow syncs to replace manual snapshots toggle is turned to On, the manual snapshot is replaced when the Push Live Forecast and/or Push Forecast revenue is synced. If this setting is disabled, syncs are replaced with manual snapshots.
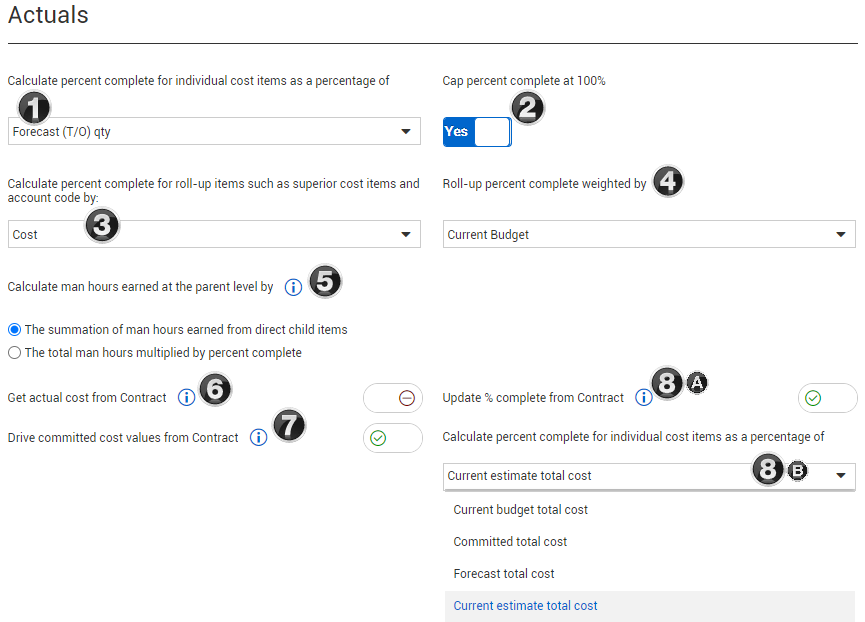
The image and table below give a brief explanation of Project Tracking: Actuals settings.
|
Title |
Function |
|
|---|---|---|
|
1 |
Calculate % complete |
Calculate percent complete for individual cost items as a percentage of:
|
|
2 |
% complete cap |
Cap any cost item percent complete at 100% |
|
3 |
Calculating roll-up method |
Calculate percent complete for roll-ups, such as superior cost items and account codes by Cost or Manhours |
|
4 |
Roll-up % complete |
Roll-up percent complete weighted by
|
|
5 |
Calculate man hours earned at the parent level by… |
Calculate man-hours earned for roll-up items by summing the man-hours earned of the contributing items (regardless of roll-up items percent complete). Option 1: The summation of man hours earned from direct child items Option 2: The total man hours multiplied by percent complete |
|
6 |
Get actual cost from Contract |
When turned on, the subcontract actual cost is received from Contracts. Actual costs from Contract can consist of a goods receipt, an accrual, or an invoice receipt/payment form. If a goods receipt and an invoice receipt come in at the same time for a record, the higher cost is recognized and not duplicated. |
|
7 |
Drive committed cost values from Contract |
When turned on, the committed costs is driven from Contracts. When turned off, committed costs are derived from the ERP. |
|
8a |
Update % complete from Contract |
Quantities that are claimed in Contract for SOV items updates the percent complete in Control when the Update % complete from Contract switch is enabled. Updating the percent complete provides you with another way to claim quantities against schedule of value items in Contract. When quantities are claimed against a schedule of values item in Contract and the Get quantities sync is executed in Control, the cost items actuals quantity completed gets updated with a percentage claimed toward the contract's schedule value total cost.
|
|
8b |
Calculate percent complete for individual cost items as a percentage of |
Calculate the percent complete for individual cost items as a percentage of
|
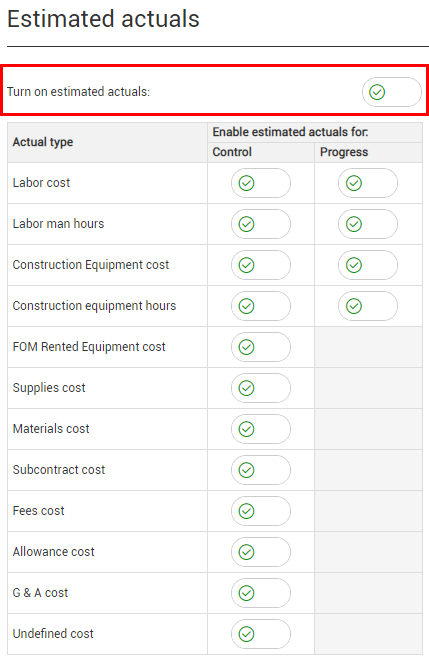
This feature allows estimated actuals to be accrued to a cost item, then used to contribute to the forecast. This results in the forecast being more accurate. The estimated actuals are calculated based on the cost category values associated to the cost items.
When Turn on estimate actuals is enabled, you can choose to turn on or off estimated actuals based on the cost category. You can enable estimated actuals in both Control and InEight Progress.
When any one of the following cost categories are enabled, the Claim Actuals tab shows the option when claiming quantity to accrue estimated cost based on the amount claimed.
You access the Claim actuals tab from the Control > Workspaces page by right-clicking the cost item on the CBS tab and selecting Actuals details. The Actuals details slide-out panel is then shown where you can select the estimated actuals option.
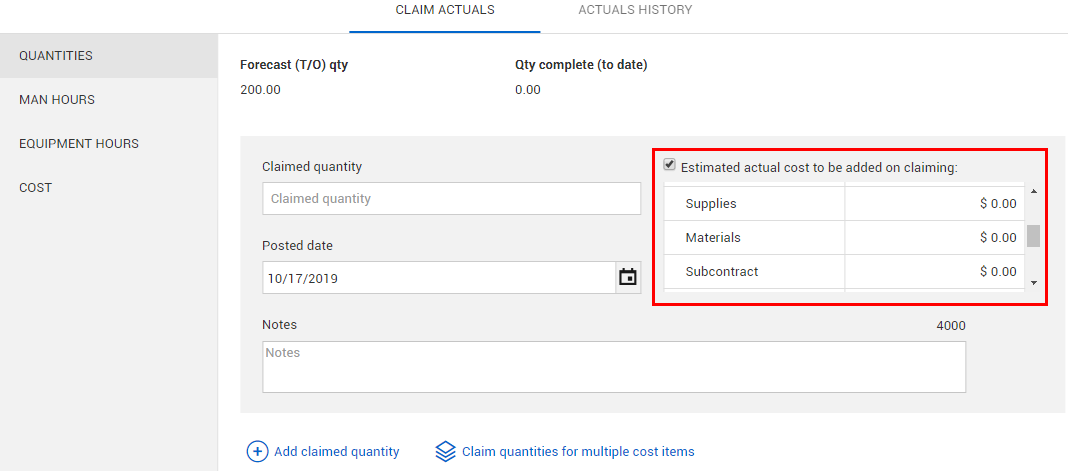
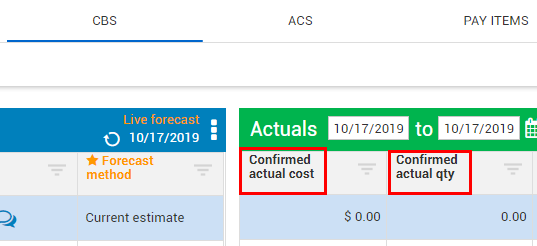
On the CBS tab, the estimated actuals are shown as columns. These values can be added to the Confirmed actuals (actuals that were imported into Control or manually entered in Control) to get all the actuals for the project that are available. This helps you more accurately forecast your project.
Using an example for Progress, if you have labor cost and man hours enabled for Progress and there is an approved daily plan in Progress, those man-hours go over to Control automatically as estimated man-hours. Then, those man-hours generate an estimated cost based on the operational rates for that resource. In this case, it would be using the Straight time rate, the Double time rate, and the Over time rate.
The same process can happen for construction equipment and equipment hours. For example, if you claim equipment hours in Progress and they are in an approved daily plan, then those hours go over to Control as estimated equipment hours. The operational and equipment resources also have a unit cost. Those hours times for that unit cost can then be used to generate an estimated construction equipment cost.
If man-hours and equipment hours are enabled, then you claim a quantity, it can generate estimated man-hours and equipment hours if there are CE amounts on those hours. For example, CE man hours per unit and CE equipment hours per unit can be estimated. If those are nonzero and you claim quantity, then the estimated man hours and equipment hours are generated.

If you do not have estimated actuals enabled in the project settings, you do not see any of the Estimated actuals columns, and you also cannot add them to your view. Some of these columns are a direct correlation with Progress.
Some of these columns are also from Control. The columns from Progress generate actual man-hours and equipment hours from claimed quantity in Control. These columns come over directly from Control and they affect your forecasts. Any estimated man-hours are included in your man-hours to date and then the estimated actual cost is included in your total cost to date.
Your forecast equations look for total cost to date, man-hours to date, and equipment hours to date to generate forecasts.
When you have synced everything from Progress, it is now in your ERP system. You can then bring in the man-hours and equipment hours through the sync.

After the sync is completed, you can reverse the estimated actuals as they have been accounted for as confirmed actuals by bringing the actuals through the sync.
The Estimated columns are only general estimates. They are not confirmed hours until synced with an ERP or an external payroll system. With an ERP you can make changes to where you can have taxes added on which would raise the price for the estimated actuals. Estimated actuals that go into Control from Progress are not guaranteed to be 100% correct. Your ERP is what confirms the final cost.
When you bring in values from your ERP system, you can reverse your estimates with the actual values as the replacement.
If you keep the estimated values without reversing after syncing with ERP system, those values are detected as double values.
From the CBS, select the cost items you want to revert actuals.
Select the Actions drop-down menu.
Hover over Reverse estimated actuals. Then, select Reverse estimated actual eqiup hrs and const....
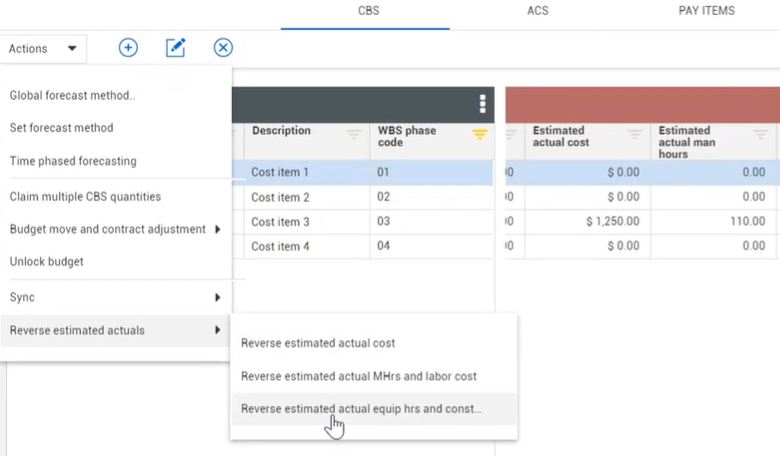
Click Yes to confirm reversal.
You can also select Reverse estimated actual cost or Reverse estimated actual MHrs and labor cost.
In the CBS, look for the Last estimated actual man hours reversal or Last estimated actual equipment hours reversal columns.
Those columns show the date of the last time you reversed the amount.
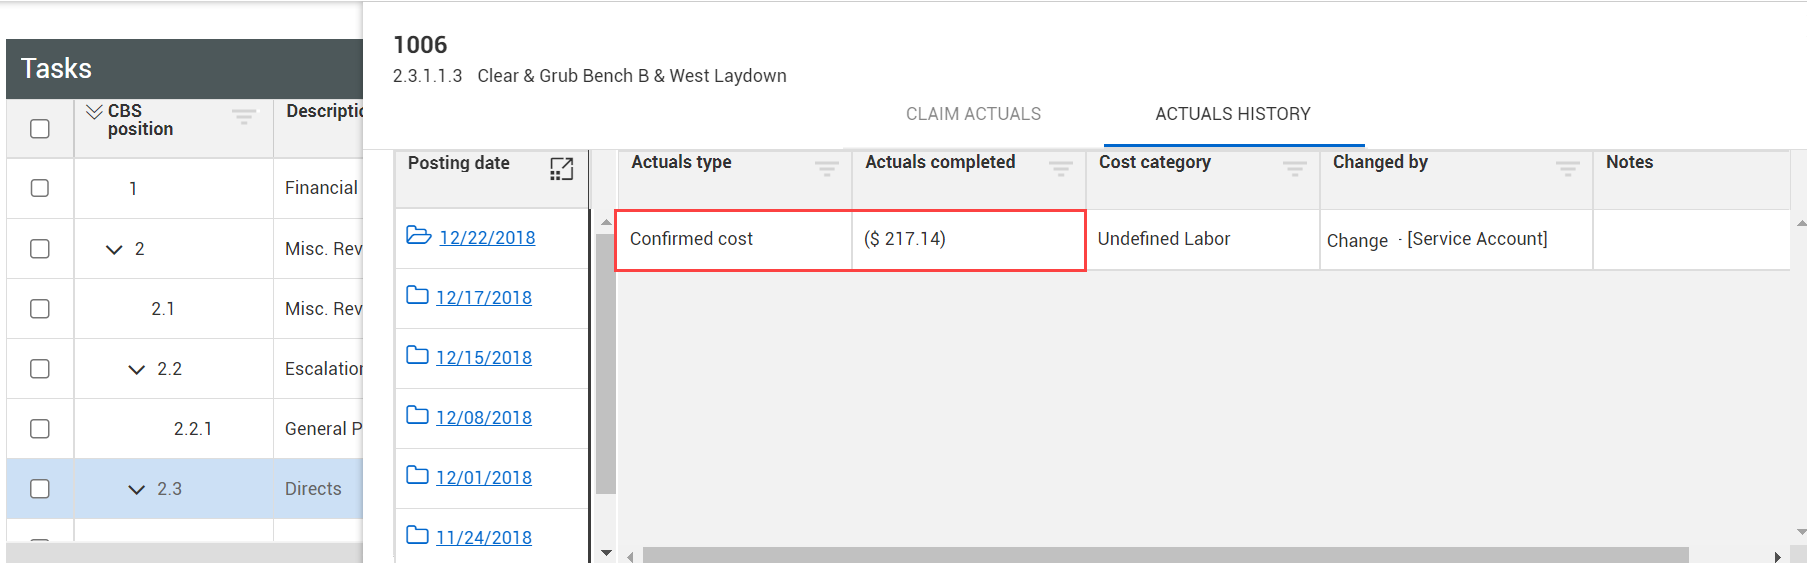
In the actual history, the reversal shows as negative entries when you have successfully reversed the estimated actuals.
Time phasing your forecast lets you take your forecast and break it down into more consumable, estimate related time blocks/periods. This gives you more visibility into what activities and costs are going to occur in smaller time periods. Time Phasing is explained further within the Forecasting lesson, under Time Phased Forecasting.
Time phasing the budget lets you plan out where to spend money in the months of the active fiscal calendar for your project. Time Phased Budget is explained further within the Revenue lesson, under Time Phased Budget.

Time phasing your forecast lets you take your forecast and break it down into more consumable, estimate related time blocks/periods. This gives you more visibility into what activities and costs are going to occur in smaller time periods. Time Phasing is explained further within the Forecasting lesson, under Time Phased Forecasting.

The image and table below give a brief explanation of Project Tracking: Forecast.
|
Title |
Function |
|
|---|---|---|
|
1 |
% complete for delta from straight-line |
% complete threshold for delta from straight-line calculation:
By configuring the value of % Complete threshold, you can determine the equation used for the Delta from Straight-Line column depending on if those cost items have their % complete greater than or less than the value set in configurations.
Changing the threshold and impacting the formula is necessary because when a cost item has not been sufficiently completed, the actuals data is not yet reliable enough to predict the final anticipated cost (forecast cost) of that scope of work, so a different equation should be used until that cost item has been sufficiently completed.
For example, if the threshold is 3% complete, and a cost item is less than 3%, then delta from straight line = Forecast total cost - CB total cost. Once the cost item has reached 3% complete, then the calc switches to Forecast total cost - Average performance total cost |
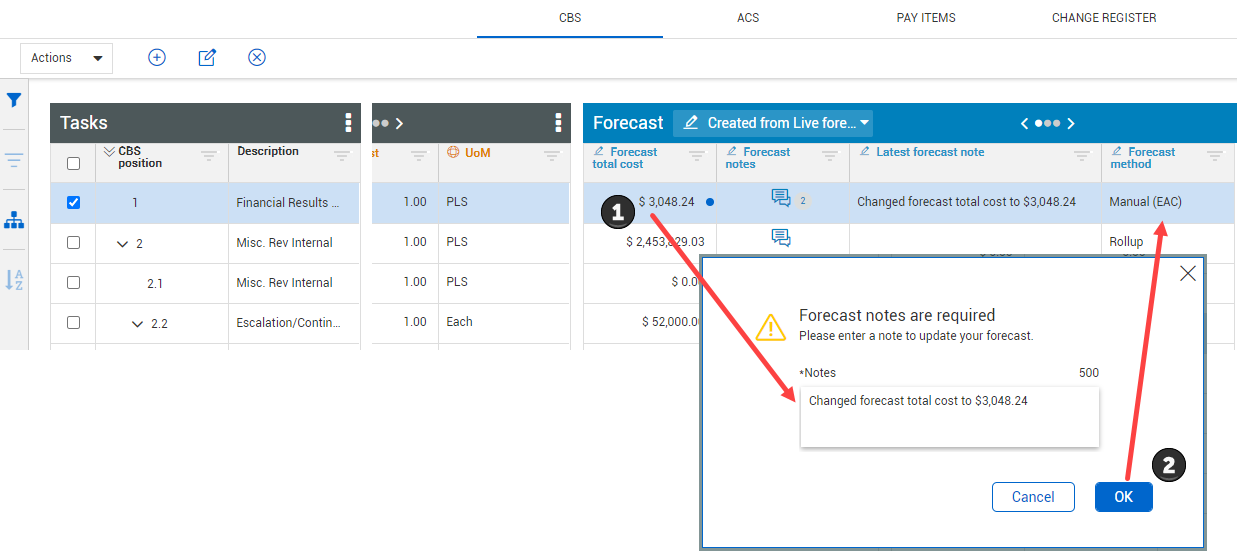
You can set manual forecast notes to be mandatory when switching to a manual forecast type. When the Mandatory notes for manual Forecasts switch is set to On, entering forecast notes is mandatory for Manual (EAC) and Manual (ETC) forecasts.

When manually forecasting, notes are required to be entered in the Forecast Notes dialog box. Once confirmed, the notes are captured, and the forecast method automatically changes to Manual.
This feature helps to keep track of manually entered forecasts. You can use the notes to explain the forecast. For example, you can enter a rationale for why a manual forecast is being used.
You can create custom forecast methods at both the project and organization levels by configuring your own calculations.
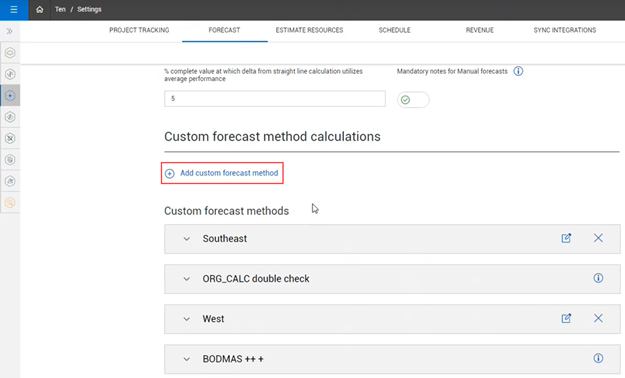
To create a custom Forecast Method, click Add custom forecast method, and then enter the Forecast Method Name, Forecast Total Cost and Forecast Total Mhrs calculations. You can create a maximum of 10 custom organization and project level forecast methods each at one time.
Select the Formula icon to choose fields to include in your forecast formula.

In the CBS you can set the Custom Forecast Method for a cost item at the organization or project level, which updates the Forecast Total Cost and Forecast Total Mhrs based on the calculations created in Settings.

Select which forecast methods can be used based on the allow as- built settings, for both terminal and non terminal cost items.
There are multiple forecast allow as-built options to choose from to help you configure your forecasted cost items, in addition to the existing available Control forecasting methods. When an option is disabled, that method is not available to select for cost items with the allow as-built selected.

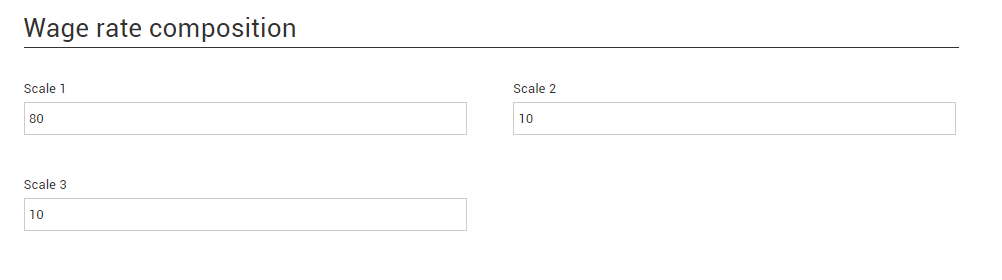
The Wage rate composition determines what percentage of each labor hour will be calculated at the scale 1, scale 2, or scale 3 rate.
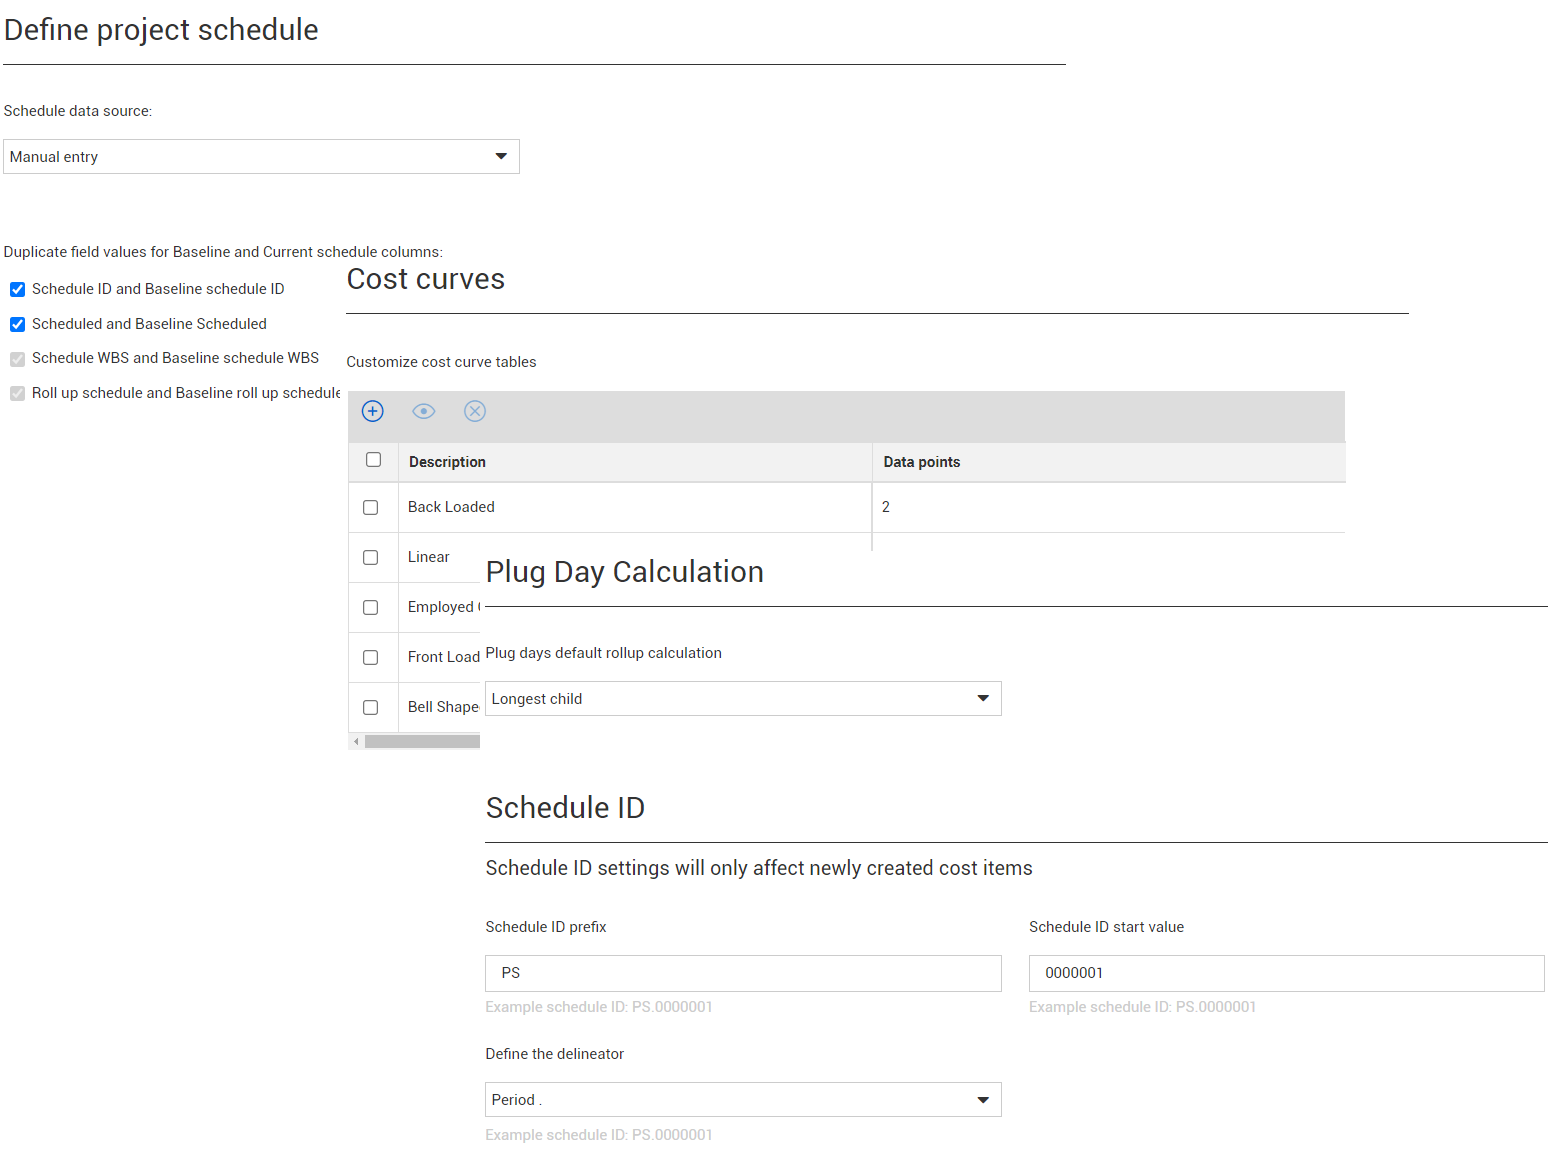
Under the Schedule sub-tab, you can define the data source for your project's schedule using manual entry or import using and XER type file. You can also create custom cost curves to apply to your progressed work, based on actual costs and schedule. Plug day calculations and Schedule ID's are also maintained in the Schedule tab.

You can change the Retention percentage, Tax rate, and Payment Timing at the cost category level.

You can set the average calendar days elapsed from the billing collection, in addition to setting the end of project date to any of the options available in the drop-down menu.
You can also enter a default retainage percent that is held back from each bill on the pay items. Pay item retainage creates an incentive for contractors to complete contracted work on a project. Typically, contractors do not get paid the total amount of money until all work or a set milestone is completed. With pay item retention, an agreed upon retainage percentage is held back by the owner for each bill by the client until the owner agrees to release the retention.
When changing the Default retainage percent setting you can choose to either update all existing items on a project, update matching existing pay items, or only apply to pay items created in the future.

When it is time to bill for a pay item, the retainage percentage is used to automatically withhold the percentage of the bill specified in the Billed Revenue details slide-out panel. You can also see your adjusted net bill which excludes the retention withheld amount.
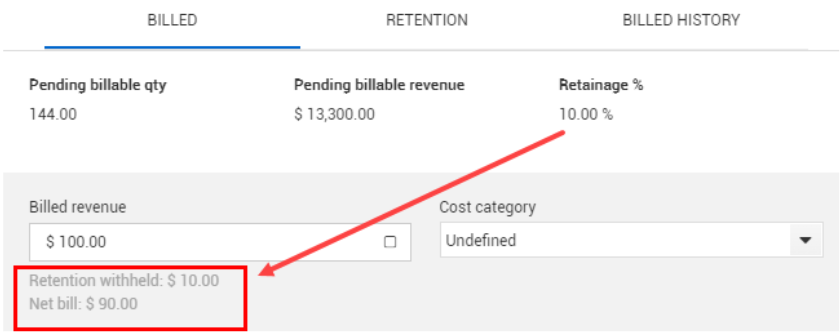
On the Pay Items page, the Net billed revenue shows $90.00, while $10.00 is being withheld.

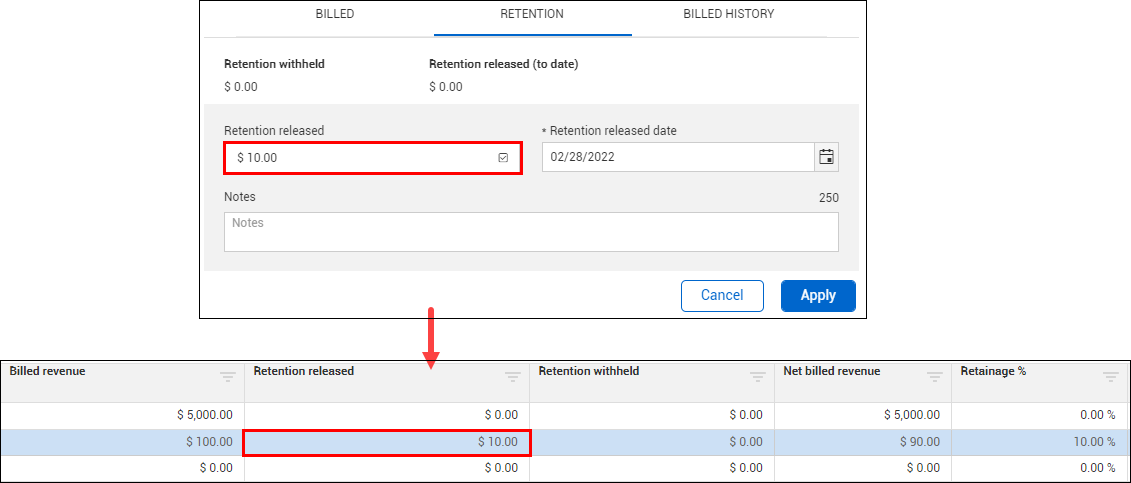
You can also release and track your full or partial retention amounts in both Billed Revenue Details and Bill Multiple Pay Items, set a retention release date, then view the results in the Pay Item register.
When approving contract adjustments from Change to Control, pay item amounts are not required to equal the amount received from Change if the Enforce change order price values to match between Control and Change is turned off. In Settings > Control > Revenue, disabling the switch to theOff position is ideal when pay items are not being used in a contract adjustment.
The example below shows a CCO agreed price of $101.00 and an Adjusted current price of $22.00. When advancing to the Summary page, you can now approve the contract adjustment without the CCO agreed price and Adjusted current price matching.
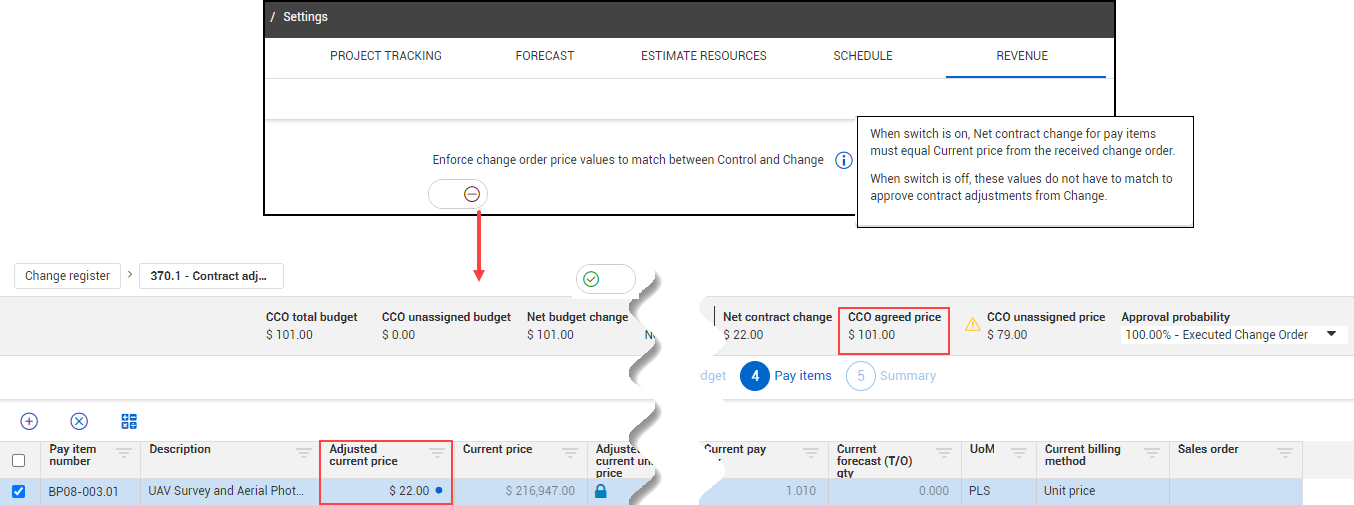
When the Enforce change switch is enabled, the error message below stating that the contract adjustment cannot be approved shows when the Adjusted current price does not equal the CCO price.

You can also manage the settings for billing method default earning rules, pay item forecast quantity rollups, and the markups. You can select the default earnings amounts based on forecast takeoff quantity. The default earnings are calculated using the forecast takeoff quantity of the cost item and comparing it to the total forecast takeoff quantities of all of the cost items assigned to that pay item to generate the percentage.
The Fixed final price and Unit price settings let you select a default way to calculate those earnings amounts based on takeoff forecast quantity or CE final cost. After the settings are saved, all of your fixed final price pay items that normally calculate based on CE final cost and unit price then calculate forecast takeoff quantity or any of the other options you select. You can still modify this selection at the pay item level.
In the Revenue tab, you can manage settings for Pay Item Forecast takeoff quantity rollups. This setting is used for pay item unit price only.

The toggle is only applicable to unit price pay items. It lets you enable the pay item forecast take-off quantity to be calculated based on the sum of all the assigned cost items forecast takeoff quantities.
When enabled, you can no longer edit your pay item forecast takeoff quantity in the Pay item register. If you click a field, you can no longer edit that field.
The Fixed final price and Cost plus values can be edited. The calculation is the sum of all the contributing cost item’s forecast takeoff quantities. It can contribute to the pay item forecast if it has the same unit of measure.
For example, you cannot add unlike units of measure. Only cost items that have the same unit of measure as the pay item can contribute to that pay item’s forecast takeoff quantity.
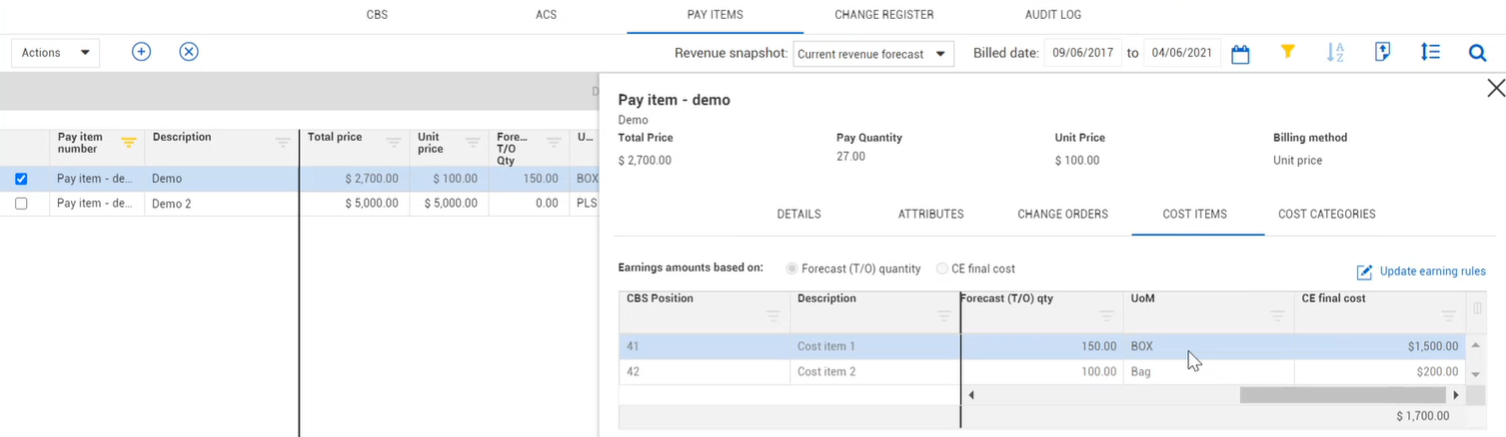
In the image above, the two cost items have different units of measure.
Cost item 1 has a unit of measure of box, which also has the pay item contribute quantity box checked. Cost item 2 has a unit of measure of bag with the pay item contribute quantity box unchecked. When you go into the update earning rules editor, you cannot check the pay item contribute quantity box for cost item 2 because the unit of measure does not match with cost item 1.
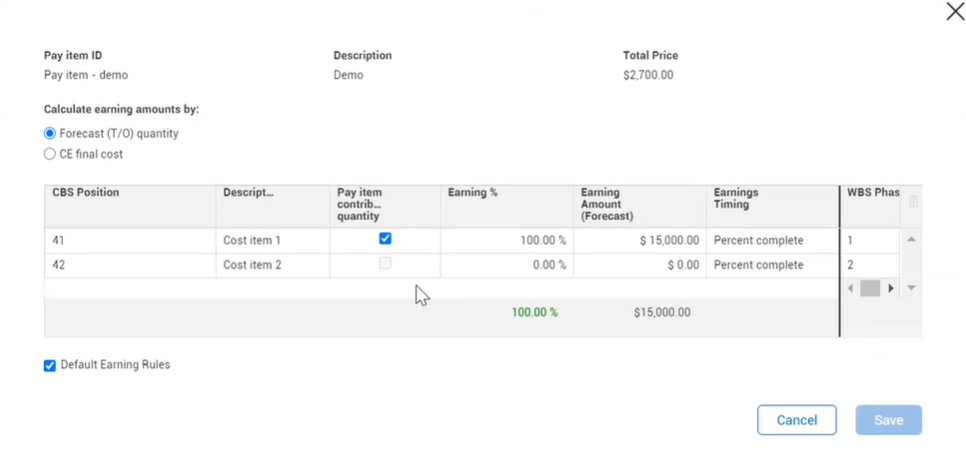
If you deselect the pay item contribute quantity box for cost item 1, the cost item’s quantity does not contribute to the pay item’s quantity. Then, the pay item quantity is zero. If it is checked, cost item 1 with the unit of measure of box has a forecast takeoff quantity of 150. This means the pay item also has a forecast takeoff quantity of 150.
In the CBS, you can change the Unit of Measure from bag to box, and then forecast take off quantity updates.
By default they both now have the pay item contribute quantity checked and the pay item forecast take off quantity is the sum of any cost items that have pay item contribute quantity checked.

For example, with cost item 2 updated, the forecast takeoff quantity from of 100 is added to the forecast takeoff quantity of cost item 1. The total forecast takeoff quantity is now 250. It includes both of them since they now both have a matching unit of measure.
Also, this affects you earnings percent as well if you have forecast takeoff quantity selected. The pay item contribute quantity for both cost items drives your earnings percent if the forecast takeoff quantity radio button is selected. It also decides which cost items are going to contribute to the pay item’s forecast takeoff quantity.
When you turn on the pay item forecast quantity rollups, the Pay item contribute quantity column does not show by default. To add it, go into the columns chooser, and then select that column. After it is brought into your view, it remains there until you deselect it from the columns chooser.

When you are in the Update earnings rule dialog box, the Pay item contribute quantity column is a default column in that view because it column is editable in the Update earning rule dialog box. That column is not editable in the main table. You can only select to add it to your main table view in the pay item slide-out panel for informational purposes.
The Pay item contribute quantity column is not available if the setting is off or if you are looking at a unit price pay item. If the setting was turned on and a user brought in the column and then decided to turn that setting off, then those columns would disappear.
When the amount of contract deliverables changes on unit price contracts, manually updating all the quantities for every associated cost item can be time consuming. Pay item forecast take off quantity allocations can be proportionally rolled down to the assigned cost items by setting the Enable pay item Forecast (T/O) qty roll down switch to On in Settings > Control > Revenue.

The unit price pay item Forecast (T/O) quantities proportionally rolls down to the contributing cost items’ Forecast (T/O) quantities. Pay item to cost item roll down changes also show in the CBS Audit log.

The Allow as-built setting must be set to All or Quantity for the selected cost items.
For more information, see Markup.
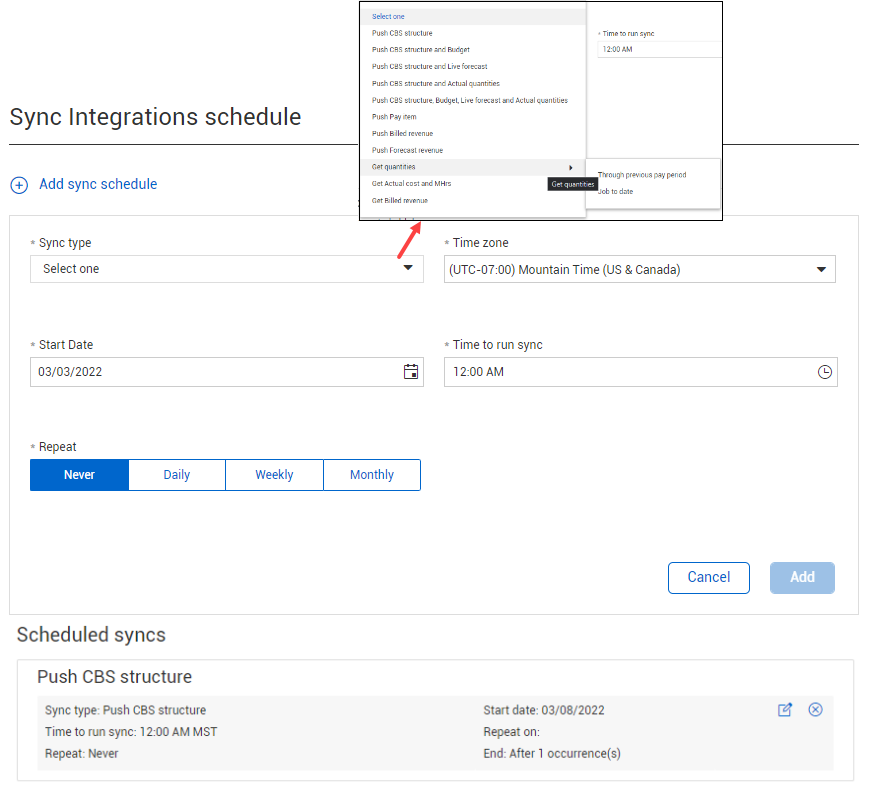
Schedule sync integrations to run at specific times such as Pushing the CBS structure or Pushing Billed Revenue.
You can prevent the project from syncing when required cost items are not included by setting the Prevent project from syncing if required cost items are not added toggle to Yes.

The image and table below summarize the different decimal precision options:
|
Name |
Function |
|
|---|---|---|
|
1 |
Currency |
Number of decimal places for currencies. Any field that includes currency data will be affected by this setting. |
|
2 |
Cost Summary |
Number of decimal places for total cost information both at the terminal and non-terminal level. |
|
3 |
Unit Cost |
Number of decimal places for any unit cost displayed. |
|
4 |
Quantities |
Number of decimal places for any quantities displayed. |
|
5 |
Percentages |
Percent complete calculations at both the terminal and non-terminal level. |
Numeric fields can be configured to omit decimals for currency, unit cost, percentages, cost summary and quantities.

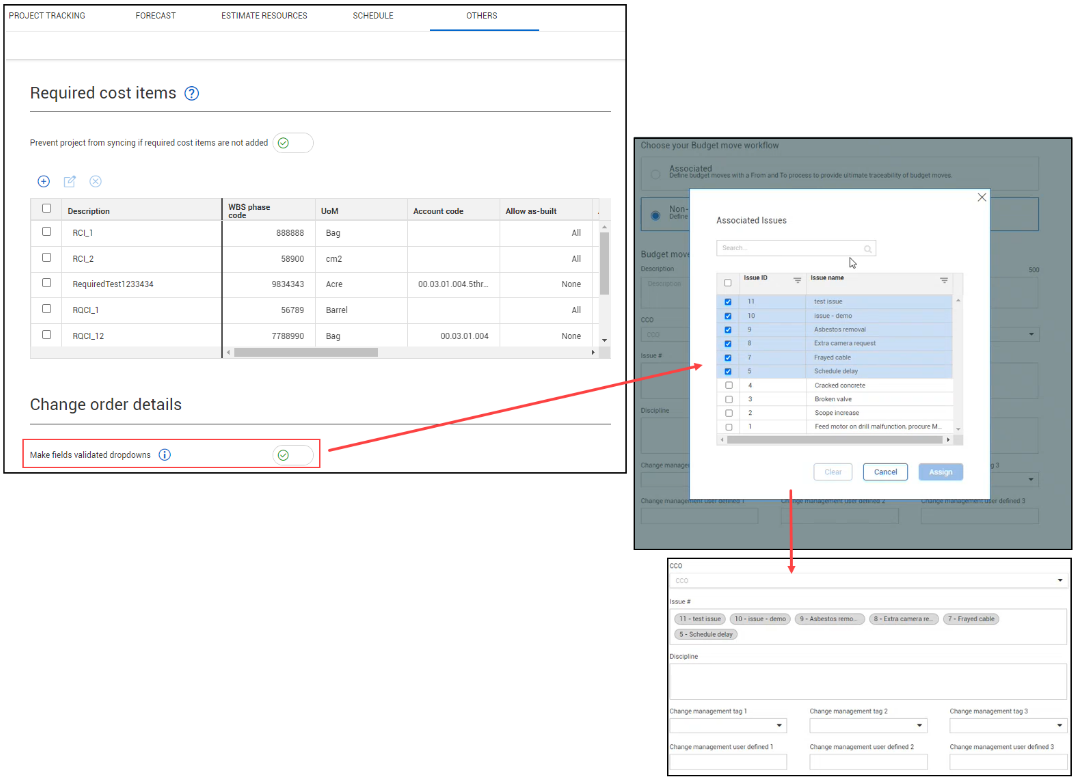
A Prevent project from syncing if required cost items are not added toggle has been added to prevent the project from syncing if required cost items are not added. The Required cost items feature lets you create standardized or most commonly used cost items at the organization level and then add them at the project CBS level.

Change Order fields can be configured as validated drop-down list fields at the organization level.
After the toggle is set to On, the Discipline, Issue #, and CCO fields are validated in the drop-down list values. When the toggle is set to Off, these fields are free text fields with no validations.
In the example below, six validated issues have been selected to be associated with this change order after it is submitted.
Additional Information
9977 N 90th Street, Suite 250 Scottsdale, AZ 85258 | 1-800-637-7496
© 2024 InEight, Inc. All Rights Reserved | Privacy Statement | Terms of Service | Cookie Policy | Do not sell/share my information